Wedding photographers cover a lot of ground in a single day. They capture countless portraits across several locations, and they typically do it under near-impossible time constraints. Through it all, however, the expectation to deliver amazing images never wanes.
While it sounds like a tough gig, we can actually use simple techniques and lighting setups (aka “recipes”) to make quick work of our wedding portraits. With just a couple off-camera flashes and some well-designed modifiers, we can turn any location into the perfect backdrop and make our couples look their best.
Below, you’ll find five easy off-camera flash recipes for couples portraits that you can use to create incredible images anywhere, even when time is limited.
Let’s get to it.
Gear Checklist
Here’s a list of the gear we used in the following five portrait recipes:
- Camera (Canon R5)
- Lens (Canon RF 28-70mm f/2)
- AD200 Flashes + Remote Trigger
- MagShoe 2
- MagGrip 2
- MagGel Full CTO
- MagSphere 2
- MagGrid 2
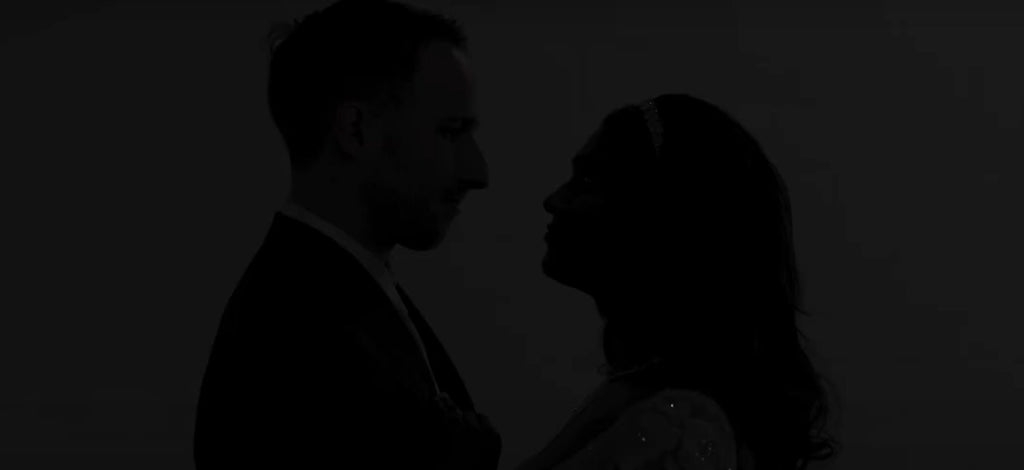
Portrait Recipe #1: Wrapping Backlight
For the first recipe, we’ll go with a simple backlight setup. It’s quick and easy to do, and the backlight will give your subjects a beautiful and moody glow.
Because we’re in an unspectacular parking garage, we’ll want to dial down our ambient exposure so that we don’t really see much of anything in the frame before adding our light. Here’s what the “before” shot looked like:
With the ambient exposure set, we can jump into our first lighting recipe.
Here’s the lighting recipe:
Place a MagGrip 2 on your flash. Next, you’ll want to add a few layers of modification. Start with a MagGel 2. The color you use is up to you. For this example, we went with a Full CTO Gel to give the flash a warm feel.
Then, put a MagGrid 2 over the MagGel and finish it off with a MagSphere 2 as the top layer. Place the flash directly behind the couple.
All that’s left at this point is to pose your subjects and capture the shot. For this technique, we used a closed pose in which the couple faces each other at a close distance, sometimes touching foreheads.

Notice the flash placement in the image above. You’ll want to position the flash directly behind the groom’s shoulder, just above the waist, and angle it upward. When fired, the light from the flash should wrap around our subjects as it bounces off their clothing and skin.
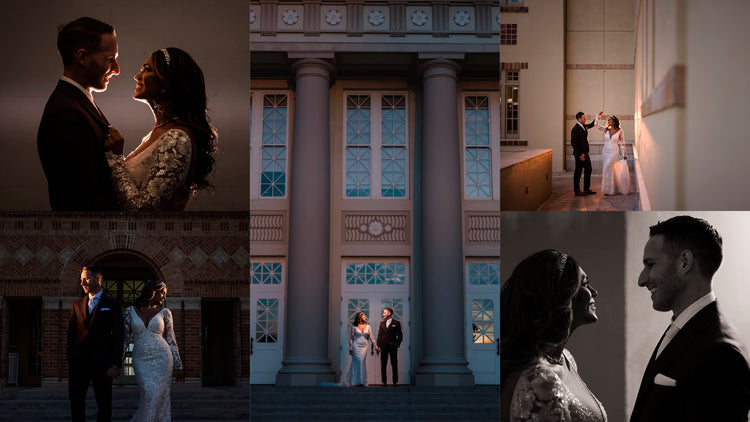
Final Images


28-70mm at 70mm, 1/200, f/4, ISO 50, Flash Power = ½ (100 watt seconds) | Special effect created by holding a split diopter up in front of the lens.
Portrait Recipe #2: Hollywood Two-Light
Next, we’re going to up the drama with a classic Hollywood Two-Light setup, which is named as such because it’s a common lighting pattern used on production sets. As the name implies, you’ll need to set up two flashes to practice this technique. If you plan to try this out during midday, be sure to find some shade. Otherwise, save this recipe for when you’re shooting at night or in dim light. We’ll use an open pose for this shot and pose the couple so that they’re standing next to one another and looking in opposite directions.

Here’s the lighting recipe:
Place a flash on each side of the couple, slightly behind them and angled forward (see the image above). On each flash, place a MagGrid 2 to control light spill. This is optional, but you can also add a MagGel to each flash to add color and create a more dramatic look. For this shot, we used a blue gel for the groom and a warm gel for the bride.
Final Image

Portrait Recipe #3: Double Backlight
Now, since we already have a two-light setup in place, we’ll give the double backlight technique a try. The double backlight technique works especially well for wide angle images that highlight both subjects.
Like last time, we’re going to use one flash for each person. Instead of placing the lights just off to each side of the couple, however, we’ll place them 10-20 feet behind, around shoulder height, and aim the flashes at the back of our subjects’ heads. The change in position and placement will affect the lighting pattern and create more of an edging or rim light effect. Make sure the flashes are hidden from view.
Here’s the lighting recipe:
Put each flash onto a stand and place them at the same height. Somewhere around the couple’s shoulder height typically works best.
Add a MagGrid 2 to each flash to control light spill. Finally, use a Full CTO gel to warm the natural tones in the scene (or choose whatever color MagGel you like).
To add a bit of action to the shot, we asked the couple to do a sort of dance floor twirl.
Final Image

Portrait Recipe #4: Softbox Shortlight
This one-light short lighting technique uses a corner of a wall to create a unique silhouette look. We use it often to great effect.

Here’s the lighting recipe:
Place one or two AD200s (or comparable flash units) into a MagBox. Position the bride behind the groom and use the edge of the corner to divide them. Place the MagBox off to the side, slightly higher than the couple, and point it toward the bride. Light into her side and create a silhouette of him.
Final Image

Portrait Recipe #5: Boomed MagSphere + Plate Shot
Finally, we want to share a technique that will allow you to use your flashes and then quickly remove them in post. You’ll need an assistant for this one to handle lighting duties. If you don’t have an assistant, and you’re at a wedding, ask one of the groomsmen or bridesmaids to lend a hand.

Basically, you’re going to take two shots, one with the flash and another without it. These shots work best when taken using a tripod, but they’re not absolutely necessary (as demonstrated in the video).
After the shoot, you’ll take both images (again, one with flash and the other without) and align them in Photoshop. With the layers aligned, you can quickly mask out the lighting assistant and flash, leaving a perfectly lit couple in the middle of an epic scene.
Here’s the lighting recipe:
Place an AD200 or other flash onto a stand that can serve as a boom. Place a Full CTO Gel and a MagSphere 2 on top to warm, diffuse, and spread the light.
This technique works well in great locations, and the end results tend to be pretty fantastic.
Final Image

Conclusion
Use these recipes on your next portrait session and surprise yourself and your clients with how great any scene can look with a bit of creative composition and modified lighting.