So, What Even Is a Silhouette?
No doubt you are all probably familiar with the silhouette. It is the quintessential “epic” shot. In my mind, it is a must-have at any wedding or engagement session. Silhouettes are incredibly easy to pull off and endlessly impressive to our clients. For that reason, I make it a point to get at least one interesting silhouette during every single wedding or engagement shoot. Today I am going to teach you everything I know about making awesome silhouettes.
Creating Silhouettes with Flash
A silhouette would be made naturally by shooting against a bright window or something similar. But you can also create a silhouette using off-camera flash and make it infinitely more interesting by altering the color and shape of light using Magmod.
Light Position
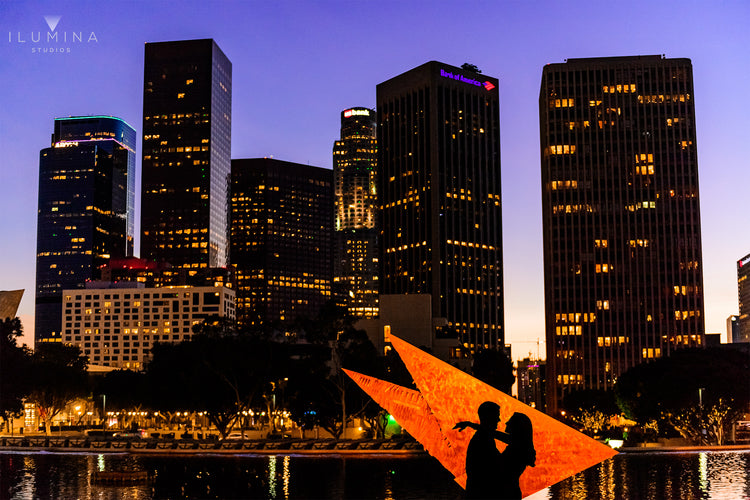
In order to have a light source behind your subjects, you need to illuminate something behind them to create an area of light to silhouette against. Normally for me, this means having the couple hold my flash, pointing it towards a wall behind them to create an orb of light. However, I have also been known to light up particular objects like statues or doors to create something to silhouette against.

Shaping and sizing your light
The objective of creating a silhouette using flash is to throw an orb of light behind your subject and then underexpose your subject against that light. But the shape, size, and color of that orb of light can vary drastically depending on many factors. I am going to go through all those factors so you can understand how they affect your light.
1. Distance
The distance between the light and the background has an impact on the size of the orb. The closer the light is to the background, the smaller the light will appear. Conversely, the further back the light is from the wall, the bigger the light will appear.
2. Flash Zoom
The amount that the flash is either zoomed in or zoomed out will also have an impact on the size of your light. The more you zoom in, the tighter the light will become. The zoom level will also impact the quality of the light. Often times if you are zoomed all the way out, the flash will cast a shadow of the Fresnel lens. For that reason, I am usually at about 50mm on the zoom level, and then I use distance to size the light exactly how I want it.
3. Using light position to shape the light
The shape of the light can be determined by two factors: either the modifier you are using or the position of the light and how it falls onto the background. If your light is low and pointed high onto your background, you will get an oval shape. The same is true if you have the flash either to the right or left of the center of your subject and then have the flash aimed towards the center. That will also create an oval shape as light will hit the background at an angle.
4. Using a modifier to shape the light
The shape of the light can also be determined by the modifier you are using. Bare flash will often create a bit of an oval shape because the flash head is rectangular and throws off a rectangular shape that defuses into an oval. Putting a MagGrid onto the flash will shape the light into a more circular shape. Putting two grids on the flash will make it even more circular with sharp edges. Using the MagSphere will spread the light out, making it a more organic and defused shape. You can even get extra crazy by using the MagBeam to throw a pattern onto the background.

Coloring your Silhouette
One of the fastest ways to add interest to your silhouettes is to add a creative color gel. Often times I will use a color that contrasts with the other elements in my frame. For example, if my foreground is orange, I will use a blue color gel because blue and orange are opposite of each other on the color wheel. That's what makes them complementary colors.
Getting Strong, Clean Silhouettes
To achieve completely black silhouettes with strong crisp outlines, I use high-speed sync as it helps me to completely remove the ambient light that may leave the subject slightly illuminated. Whether you want to include a little bit of subject detail or go completely black is a personal choice. But for me, I want the cleanest silhouette possible so I will use high-speed sync to eliminate any ambient light that may be hitting the subject.
Getting Creative
Plain ol’ silhouettes are boring! To really make your image stand out, you need to get creative. There are tons of ways to take silhouettes to the next level and get creative with them.

Foreground Elements
I usually look for foreground elements that are self-illuminated, such as twinkle lights, candles or lamps—anything I can find that I can use to add interest and also help frame or lead the eye into the subject. The reason I usually look for things that are illuminated is because I want to underexpose the frame so that the shadows go black. Objects that are illuminated will remain in the frame as I underexpose. That way the only visible elements in the frame are the foreground element and the silhouetted subject.

White Balance Shift
I will often times use my white balance to force a color cast. I will then use the opposing color gel to create a color contrast. For example, if I am shooting through some twinkle lights, I will set my camera's white balance to 10,000K, which makes the camera add an orange color cast. Then I will create a silhouette using the Blue Creative Gel so that the silhouette is blue. This creates a strong color contrast between the orange twinkle lights and the blue silhouette.

Multiple Exposures
Multiple Exposures are an awesome way to take silhouettes to the next level. Once you have a strong clean silhouette, you can multiple expose it onto any kind of frame—things like bokeh, stained glass or anything you want! The sky’s the limit with regard to creativity. (To learn how I do multiple exposures, you can read my guide here.)
Want to learn more?
Silhouettes are just one technique for creating awesome wedding photos with flash. In my new workshop, I teach nine other incredible flash techniques for creating award-winning images anywhere, anytime, in any light. For more information on my workshops, click here. Spaces are limited to 12 people per workshop and spots sell out quickly, so make sure to put your name on the email list to get notified right away when a new workshop opens up.
About Carsten
Carsten Scherzer is a formerly homeless teenager turned professional wedding and engagement photographer based in Los Angeles. You can see more of his work at www.iluminastudios.com. Follow him on Instagram and YouTube.